

Application Encyclopedia
How to observe photo - convertible fluorescent proteins with an inverted fluorescence microscope?
An inverted fluorescence microscope paired with fluorescent proteins can visualize organelles in living cells. For more precise labeling and tracing of specific target cells or specific regions, photoactivatable, photoconvertible, or optogenetic switchable fluorescent proteins are required. Although this typically necessitates a confocal microscope or super-resolution microscope, there are methods to observe them using an ordinary inverted fluorescence microscope (wide-field fluorescence). Here’s an introduction:

Observation of Photoconvertible Fluorescent Protein mEos2 Conversion
- Photoconvertible Fluorescent Proteins
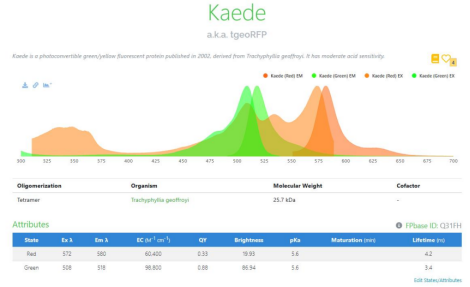
The photoconvertible fluorescent protein Kaede has two excitation peaks and two emission peaks
Photoconvertible fluorescent proteins are commonly used dyes in super-resolution imaging. Take Kaede as an example: it emits green fluorescence under excitation light, and irreversibly converts to red fluorescence upon ultraviolet (UV) irradiation. This property allows researchers to define specific cells or specific regions within cells as the region of interest (ROI).

Photoconvertible fluorescent proteins are mostly derived from corals
This green-to-red photoconvertible fluorescent protein is derived from coral and named Kaede (Japanese for “maple leaf”) due to its resemblance to autumn maple leaves changing color. However, due to its property limitations, Kaede is not a reliable or user-friendly commercial live-cell stain. The three main photoconvertible fluorescent proteins commonly used in super-resolution imaging are Dendra2, mEos2, and mKikGR.

Dendra2’s fluorescence spectrum is more compatible with conventional excitation block designs.
Why use Wide-field Fluorescence Microscope?
Research-Grade Inverted Fluorescence Microscope MF53-N (Wide-Field Fluorescence)
General fluorescence microscopes are typically wide-field fluorescence microscopes. Compared with confocal microscopes, their Z-axis resolution is not as high. When magnified at high power, imaging will have halos formed by out-of-focus excitation, making it impossible to obtain fluorescent imaging with extremely sharp edges.
However, observing photoconvertible fluorescent proteins with a fluorescence microscope offers several advantages. First, the instrument cost of a fluorescence microscope is significantly lower than that of a confocal microscope. Additionally, it is relatively simple and easy to use, making it a more widely accessible piece of equipment.

Under long-pass U excitation, the fern leaves exhibit multi-color fluorescence
Moreover, in pursuit of precision, confocal microscopes typically cannot observe the conversion process simultaneously during photoconversion operations. In contrast, the U ultraviolet excitation block configuration of fluorescence microscopes often uses LP long-pass emission filters, which can display emissions from blue to red wavelengths simultaneously, allowing real-time observation of the conversion process while performing photoconversion.
- How to Observe Photoconvertible Fluorescent Proteins with a Fluorescence Microscope?

Research-Grade Inverted Fluorescence Microscope MF43-N
To observe photoconvertible fluorescent proteins using a fluorescence microscope, the prerequisite is to have a multi-color excitation block configuration and a field diaphragm in the fluorescence optical path. The U excitation block (DAPI excitation block) with long-pass configuration is required, which may need a research-grade fluorescence microscope.

Connexin43-Dendra2 Reveals Dynamics of Gap Junction Protein Cx
Pre-conversion Imaging and Preparation:
- Darkroom Preparation and Eye Adaptation:Turn off lights to create a darkroom, allowing eyes to adapt to low light for optimal imaging.
- Switch to Blue Excitation Block:Select 450–490 nm blue excitation filter block, matching pre-conversion green fluorescence (e.g., Dendra2 under blue light).
- Adjust Light Source Intensity:LED:,Dim brightness and turn off temporarily;Mercury lamp: Insert ND filter and close excitation shutter (if available)
- Switch to High-Magnification Objective:Rotate to 100X oil-immersion or 60X oil lens; apply immersion oil for optimal light transmission.
- Load Prepared Sample:Place sample (e.g., glass-bottom dish with photoconvertible protein-expressing cells) on stage, secure firmly.
- Focus Cells via Phase ContrastL:Use phase contrast to locate and focus on target cells; center ROI for photoconversion.
- Activate Excitation Source:LED,Turn on and adjust to suitable intensity;Mercury lamp, Open excitation shutter (if closed)
- Capture Pre-Conversion Green Images:Optimize exposure time/gain; save clear green fluorescence images as reference.
- Switch to Green Excitation for Red Fluorescence:Change to 500–550 nm green excitation block; minimal red fluorescence should be detected at this stage.

Dendra2-H2B Reveals Histone H2B Exhibits High Stability
Observation and Imaging of Photoconverted Fluorescent Proteins:
- Phase Contrast Alignment,Center target in field of view using phase contrast.
- Narrow Field Diaphragm,Reduce fluorescence illumination area via field diaphragm adjustment.UV-Mediated Photoconversion.
- Switch to UV excitation; increase LED brightness/remove ND filter (mercury lamp).Monitor green-to-red conversion through eyepiece (adjust diaphragm size; conversion time: 5–10s based on UV intensity).
- Switch to the blue (B) excitation block, open the field diaphragm, capture green fluorescence images, then switch to the green (G) excitation block for red fluorescence imaging—distinct red fluorescence should now be visible.
- Time-Lapse Acquisition.Set interval imaging for green/red channels to track cellular/protein dynamics.

Dendra2-α-tubulin Traces the Dynamic Polymerization and Depolymerization of Tubulin
Using this workflow, you can also observe photoactivatable proteins, FRET (Fluorescence Resonance Energy Transfer), and photoswitchable fluorescent proteins, which is highly convenient for macro-level teaching and research.